Showing posts with label Ms Office Tips. Show all posts

Wednesday, March 5, 2014

How To Compare Two Excel Files using SpreadSheet Compare

Office 2013 has a couple of new features including a new program called Spreadsheet Compare. Spreadsheet Compare takes two Excel files and tell you the difference between them in a very nice table layout. You can quickly see the differences in formulas between two spreadsheets and the differences in values also.
It’s a very useful program, especially if you use Excel a lot in collaboration with others. If you email someone an Excel file and they make changes to a few formulas, etc, you can use Spreadsheet Compare to quickly see what edits were made to the original. In this post, I’ll walk you through the program interface and how you can use it.
When you first open Spreadsheet Compare, you will see the main program screen, which looks like this:
speadsheet compare
There is only one ribbon tab that has a couple of options like showing formulas, resizing cells to fit and exporting results. In the center is the split screen view of the two Excel files you will be comparing. At the bottom are three windows, one for which options you want to see, one for viewing the actual differences in a table view and one that displays visually where most of the differences take place.
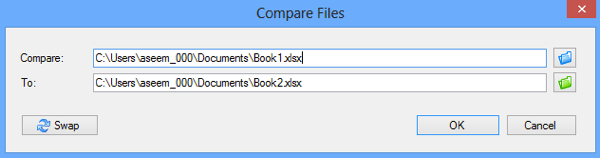
Click on Compare Files at the top left and then choose the two Excel files you want to compare.
compare two excel files
Now you can quickly see by the color-coded cells what values or formulas are different.
excel differences
As you can see, entered values are green, formulas are purple, calculated  values are bluish, etc, etc. These are my example spreadsheets where one takes 5 pairs of numbers and adds them and the other just multiples them.
compare two spreadsheets
Since the only difference is one column is using a sum and one is using multiplication, the values are highlighted in purple, which means the difference is in the formulas. You can also click the Show Formulas button in the ribbon to quickly see the difference in the formulas.
see differences
The table at the bottom will quickly give you a detailed overview of the changes. Note that you can uncheck any of the items at the left in case there are hundreds of entries. You can filter to only see changes in entered values, calculated values, formulas, etc.
table view
The graph on the right will quickly tell you how many of each type of change was recorded in the spreadsheet:
changes graph
Finally, you can either export the results out to an Excel spreadsheet or copy the results to the clipboard. The exported results showing the differences basically just exports the table that is shown above.
exported results
So that’s about it for Spreadsheet Compare 2013. It’s a nice handy tool for those people working with multiple versions of the same spreadsheet and it can definitely save you a lot of time and energy. Enjoy!
How to Separate First and Last Names in Excel

So if you use Excel a lot, you have probably run across the situation where you have a name in a single cell and you need to separate the name into different cells. This is a very common issue in Excel and you can probably do a Google search and download 100 different macros written by various people to do it for you.
However, in this post, I’ll show you how to setup a formula so you can do it yourself and actually understand what is going on. If you use Excel a lot, it’s probably a good idea to learn some of the more advanced functions so that you can do more interesting things with your data.
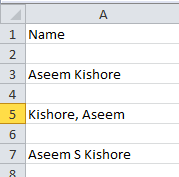
To get started, let’s see how names are usually stored in a Excel spreadsheet. The most common two ways I have seen are firstname lastname with just a space and lastname, firstname with a comma separating the two. Whenever I have seen a middle initial, it’s usually firstname midinitial lastname like below:
separate names excel
Using some simple formulas and combining a couple of them together, you can easily separate the first name, last name and middle initial into separate cells in Excel. Let’s start with extracting the first part of the name. In my case, we’re going to use two functions: left and search. Logically here’s what we need to do:
- Search the text in the cell for a space or comma, find the position and then take out all the letters to the left of that position.
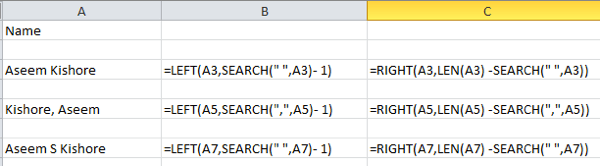
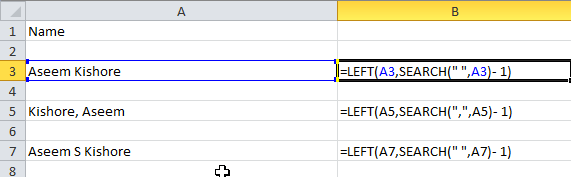
Here’s a simple formula that gets the job done correctly: =LEFT(NN, SEARCH(” “, NN) – 1), where NN is the cell that has the name stored in it. The -1 is there to remove the extra space or comma at the end of the string.
extract names excel
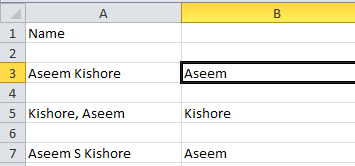
As you can see, we start out with the left function, which takes two arguments: the string and the number of characters you want to grab starting from the beginning of the string. In the first case, we search for a space by using double quotes and putting a space in-between. In the second case, we are looking for a comma instead of a space. So what is the result for the 3 scenarios I have mentioned?
excel separate names
We got the first name from row 3, the last name from row 5 and the first name from row 7. Great! So depending on how your data is stored, you have now extracted either the first name or the last name. Now for the next part. Here’s what we need to do logically now:
- Search the text in the cell for a space or comma, find the position and then subtract the position from total length of the string. Here’s what the formula would look like:
=RIGHT(NN,LEN(NN) -SEARCH(” “,NN))
excel formulas
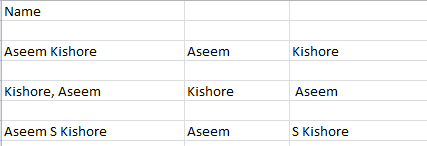
So now we use the right function. This takes two arguments also: the string and the number of characters you want to grab starting from the end of the string going left. So we want the length of the string minus the position of the space or comma. That will give us everything to the right of the first space or comma.
excel extract first name
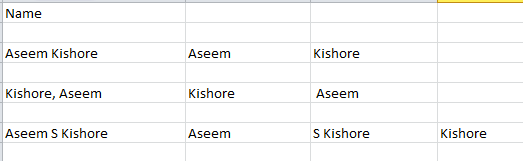
Great, now we have the second part of the name! In the first two cases, you’re pretty much done, but if there is a middle initial in the name, you can see that it the result still includes the last name with the middle initial. So how do we just get the last name and get rid of the middle initial? Easy! Just run the same formula again that we used to get the second section of the name.
excel extract last name
So we are just doing another right and this time applying the formula on the combined middle initial and last name cell. It will find the space after the middle initial and then take the length minus the position of the space number of characters off the end of the string.
names split excel
So there you have it! You have now split the first name and last name into separate columns using a few simple formulas in Excel! Obviously, not everyone will have their text formatted in this way, but you can easily edit it to suit your needs. If you are having problems separating names not in the format I have above, post a comment with your data and I’ll try to help. Enjoy!